If you are wondering how to backup iPhone then this simple guide will explain it all for you.


After purchasing your first iPhone , you have successfully completed the initial setup and downloaded all the applications you use most often. Unfortunately, however, you did not have the same luck when you tried to back up your device, which is useful for not losing data and documents in case of problems.
If things are exactly like this and, therefore, you are still wondering how to backup iPhone , let me give you a hand and explain how to do it. In the next paragraphs of this guide, in fact, you will find the detailed procedure to activate the backup on iCloud. In addition, I will also provide you with directions to keep a copy of your iPhone data directly on your computer or external hard drive.
If that’s exactly what you wanted to know, let’s not go any further and get to the heart of this tutorial. All you have to do is set aside five minutes of free time and dedicate yourself to reading the next paragraphs. By carefully following the instructions I am about to give you and trying to put them into practice, I assure you that you will be able to back up your iPhone, thus securing your data. Enjoy the reading!
How to backup iPhone to iCloud
iCloud is the first iPhone backup solution you can consider. In fact, the famous Apple service not only allows you to synchronize photos, data, documents and apps with the various devices associated with the same Apple ID but also to create backup copies of your data, which you can use to restore iPhone in case of problems. .
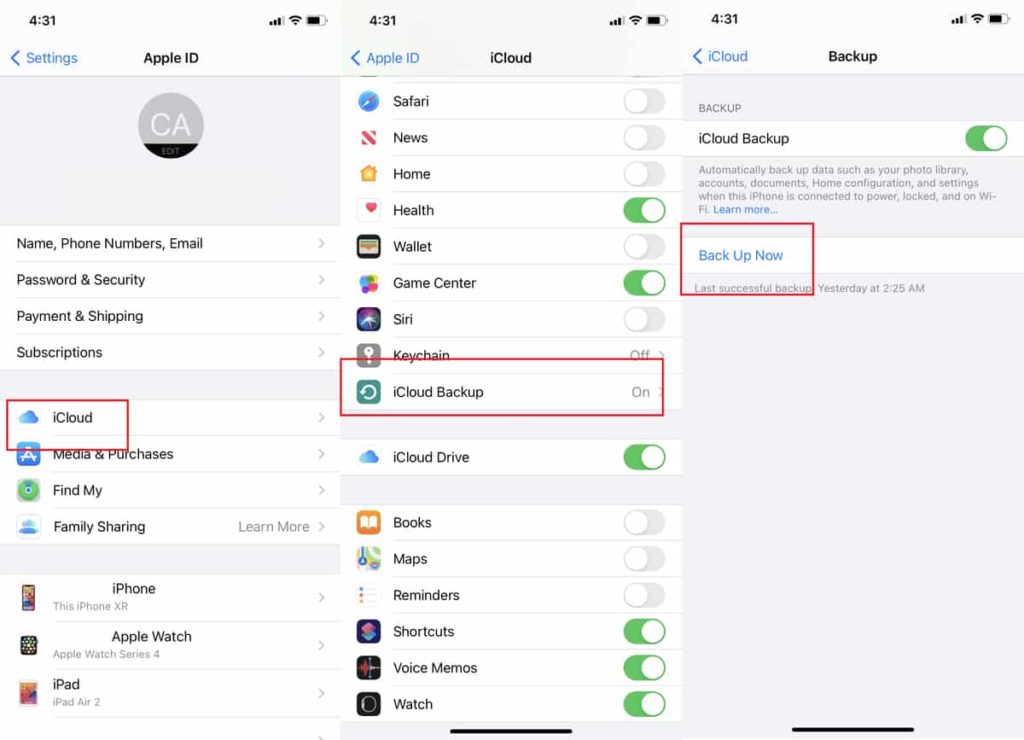
To proceed, then take your iPhone, tap on the gear wheel icon to access the iOS Settings and press on your name displayed at the top. If, on the other hand, you have not yet logged in with your Apple ID , select the Log in on iPhone option , enter your account data in the Email and Password fields and press the Next button to log in to iCloud.
At this point, in the Apple ID screen , tap on the iCloud item , select the iCloud Backup option and, in the new screen displayed, move the lever next to the iCloud Backup item from OFF to ON . By doing this, when your iPhone is plugged into a power source, locked and connected to a Wi-Fi network, your apps and data will automatically be backed up to iCloud.
On the Backup screen , next to Last successful backup , you can view the date and time of the last backup, if any. By pressing, instead, on the option Back up now you can start a new backup manually. To learn more, you can refer to my guide on how to backup iCloud .
How do you say? Have you tried to start your first backup but you see a message about insufficient iCloud space on the screen? In that case, you should know that the service in question offers 5 GB of free space which is used by all devices associated with the same Apple ID, both for data synchronization and for keeping backups.
To view how much space you need to make a backup of your iPhone, access the iCloud section again, tap on Manage space and select the Backup and iPhone options (available only if you have activated the iCloud Backup option as I have just explained). On this screen, you can view when the last backup was made, its size and the space occupied by the next backup.
Furthermore, if you wish, you can choose which data and applications to exclude from the backup (thus reducing the necessary space), by moving the lever relating to the app of your interest from ON to OFF . By selecting the Delete backup and Turn off and delete options instead, you can delete backups from iCloud and turn off the option to automatically perform a new backup.
In case the space to perform a backup is not enough, you can decide to exclude some data as I have just indicated or free up space on iCloud by deactivating the synchronization of unnecessary data and applications. Alternatively, you can increase iCloud space by activating one of the available iCloud + subscriptions .
- 50GB ($ 0.99 / month) : Offers 50GB of space and also allows you to enjoy Private Relay, Hide My Email, and HomeKit’s extended secure video support for a single security camera. With the Family Sharing option, the available space can be shared with up to five family members.
- 200 GB (2.99 euros / month) : in addition to the features offered by the basic plan, it provides 200 GB of storage space and support for up to five security cameras.
- 2 TB (9.99 euros / month) : this plan also has all the features of the basic one, but offers 2 TB of storage space and an unlimited number of security cameras is supported.
How to backup iPhone to PC
To backup iPhone to PC you need to use iTunes , the famous multimedia software developed by Apple.
If you have a PC with Windows 11 or Windows 10 , you can download and install iTunes directly from the Microsoft Store . If, on the other hand, you are using an older version of Windows, connect to the official Apple website , click on the Download now iTunes for Windows button and wait for the download to complete.
Once you have iTunes, connect your iPhone to your computer via the Lightning cable (the same one you use to charge your phone) and wait for iTunes to start automatically.
Once this is done, if it is the first time that you put the two devices in communication, authorize the connection by pressing the Continue button that appears on the computer screen and on the Authorize item shown on the iPhone display and type the unlock code on the latter . If everything went well, the phone icon will appear in the top left of iTunes to indicate that your iPhone is connected.
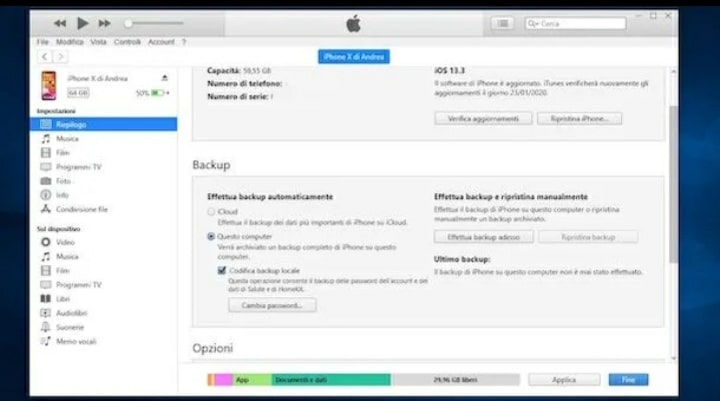
Then click on the icon in question and, in the Summary screen , locate the Backup section . Then affix the check mark next to the options This computer and Local backup encryption (required to save information about the Health and Homekit apps) and click Back up now button , to start backing up your iPhone. I point out that even from a computer you can backup iPhone to iCloud by placing the check mark next to the iCloud item.
Finally, I would like to point out that in the Backup section you can view the date of the last backup made, while clicking on the Restore backup button you can restore iPhone using the last backup made. To find out more, I leave you to my guide on how to backup iPhone without iCloud.
How to backup iPhone to Mac
How do you say? Would you like to backup iPhone to Mac ? In this case, if you have a Mac with macOS 10.15 Catalina or later, connect your iPhone to the computer and launch the Finder by pressing its icon (the smiling face ) in the Dock bar. Then select the iPhone entry located in the left sidebar, make sure the General tab is selected and locate the Backup section.
Once this is done, put the check mark next to the options Backup all iPhone data on Mac and Encrypt local backup (to protect passwords and sensitive data) and click on the Back up now button , to start the backup.
Again, by selecting the Backup iPhone’s most imported data to iCloud option , you can backup iPhone to iCloud . To know more, you can check out my guide on how to backup iPhone to Mac.
If, on the other hand, you have a Mac with macOS 10.14 Mojave or earlier versions, you can use iTunes and the procedure is almost identical to what I indicated above to backup iPhone to PC .
How to backup iPhone to external hard drive
If you are wondering if it is possible to backup iPhone to external hard drive , I am sorry to tell you that there is no option available that allows you to do it directly. However, you can back up your iPhone to your computer and later transfer the folder containing the backup files to an external hard drive.
To proceed, therefore, back up the iPhone on your computer following the instructions I gave you previously and proceed to connect the external hard drive to the PC . Once this is done, if you have a Windows PC , open File Explorer by clicking on the yellow folder icon visible in the taskbar, select the Local Disk item in the left sidebar and follow the path Utenti/[nome utente]/Apple/MobileSync/Backup
Now, right-click on the folder containing the backup files (you can locate it by referring to the last modification date which should coincide with the backup date), select the Send to option from the opened menu and press the name associated with your hard disk external , to transfer the folder in question to your external drive.
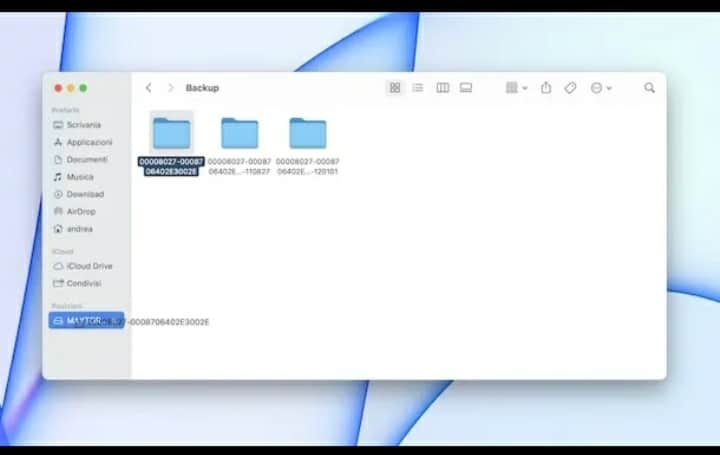
Do you have a Mac ? In this case, start the Finder by pressing on its icon (the smiling face ) in the Dock bar, press on the Go item located in the menu bar and select the Go to folder option from the opened menu. Then enter the path ~/Libreria/Application Support/MobileSync/Backup/in the appropriate field and press the Enter key on the keyboard to access the folder containing all the backups.
After locating the folder related to your iPhone backup, drag it over the name of your external hard drive , visible under the item Locations in the left sidebar, and wait for all the files to be transferred.
How to backup iPhone to Google Drive
If your intention is to backup iPhone to Google Drive , you can manually upload the documents you intend to store on the famous Google cloud storage service (15 GB for free).
In this case, you can download the Google Drive app , log in with your Google account and press the + button at the bottom right. Once this is done, select the Upload option and press on the Photos and videos item , to upload photos and videos in the iOS Photos app, or choose the Browse option , to upload any documents in the File app.
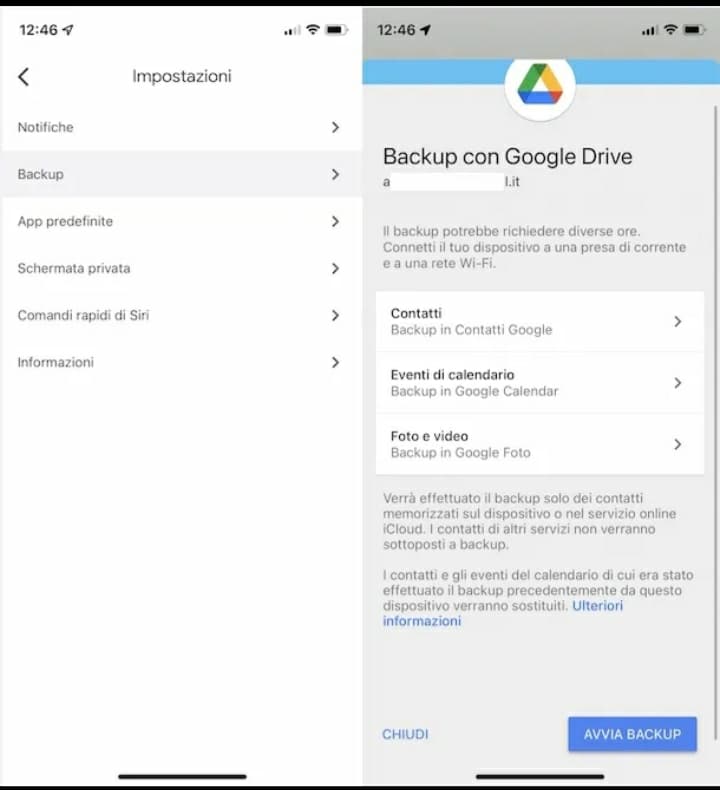
Alternatively, still using the Google Drive app, you can backup contacts , calendars and photos / videos available on your iPhone or iCloud, which will automatically be uploaded to Google Contacts , Google Calendar and Google Photos.
To proceed, start Google Drive, press the ☰ button, at the top left, select the Settings option from the opened menu and press the Backup item . Now, choose which data to backup and hit the Start Backup button.
How to backup iPhone with broken screen
It is possible to backup iPhone broken screen as long as you have previously connected your “iPhone by” to the computer. In fact, as I mentioned in the previous lines of this guide, at the first connection it is necessary to authorize the communication of the two devices by acting both from the computer and on the iPhone screen.
In that case, you can connect your phone to your computer and start the backup by following the directions I gave you earlier. If, on the other hand, you want to recover photos from broken iPhone and you have a Windows PC , open File Explorer by clicking on the yellow folder icon visible in the system tray and select the option This PC visible in the left sidebar.
At this point, right-click on the Apple iPhone item and select the Import images and videos option from the menu that appears. On the [number] new images and videos found screen , choose one of the available options: Review, organize and group items to import , to divide photos and videos into groups based on creation date, or Import all new items now , to import all files without any splitting. Then click on the Next / Import button to start the import.
On Mac , instead, start the Photos app , select your iPhone name in the left sidebar and, after unlocking your phone, press the Import all new items button , to save your iPhone photos and videos to the computer.
Finally, I would like to point out that if you need to recover further data, you need to rely on third-party software, such as EaseUS MobiSaver Free : after connecting your iPhone to your computer and scanning the device, this program allows you to recover photos, videos, contacts, messages and many other data.